WEB - nginx 설치
1. Nginx 설치
1-1. /etc/yum.repos.d/nginx.repo 파일 생성
CentOS의 기본 저장소에는 Nginx가 포함되어 있지 않거나 최신 버전이 아닐 수 있다.
그러므로 /etc/yum.repos.d/nginx.repo 파일을 생성하고 그 안에 Nginx 저장소 정보를 넣어준다.
# vi /etc/yum.repos.d/nginx.repo
[nginx]
name=nginx repo
baseurl=http://nginx.org/packages/centos/7/$basearch/    #os버전 다르면 수정
gpgcheck=0
enabled=1
1-2. Nginx 설치
# yum install nginx
1-3. Nginx 서비스 시작 및 부팅 시 자동으로 시작되도록 설정
# systemctl start nginx
# systemctl enable nginx
1-4. WEB 공인 IP로 접속해서 확인

WAS - Tomcat 설치
1. Tomcat 설치
1-1. web서버 통해서 was서버 접속
# ssh root@10.10.1.6
WAS서버의 관리자 비밀번호 입력
1-2. Tomcat 압축 파일 다운로드
# wget http://archive.apache.org/dist/tomcat/tomcat-9/v9.0.4/bin/apache-tomcat-9.0.4.tar.gz
1-3. 톰캣 설치
# 1. 압축 파일 해제
# tar -xvf apache-tomcat-9.0.4.tar.gz

# 2. 사용자 로컬 폴더에 Tomcat 디렉토리 생성
# sudo mkdir /usr/local/tomcat

# 3. Tomcat을 해당 폴더로 이동
# sudo mv apache-tomcat-9.0.4/ /usr/local/tomcat
1-4. 톰캣 실행
# /usr/local/tomcat/apache-tomcat-9.0.4/bin/startup.sh

# ps -ef | grep tomcat    #확인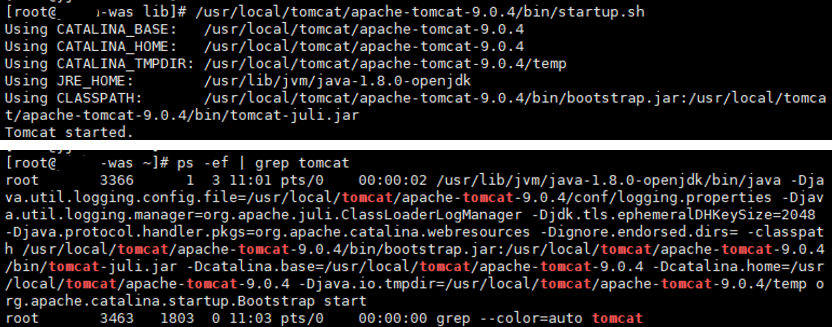
Neither the JAVA_HOME nor the JRE_HOME environment variable ~~ 에러 발생 시 👇
[Tomcat 실행 시 Error] Neither the JAVA_HOME nor the JRE_HOME environment variable is defined
Error Tomcat을 실행시키려는데 아래와 같은 에러가 발생했다. [root@ was bin]# ./startup.sh Neither the JAVA_HOME nor the JRE_HOME environment variable is defined At least one of these environment variable is needed to run this program 이
yeit.tistory.com
2. 사용자 편의를 위한 서비스 등록
# vi /usr/lib/systemd/system/tomcat.service
[Unit]
Description=tomcat9.0.4
After=networktarget syslog.target

[Service]
Type=forking
Environment=CATALINA_HOME=/usr/local/tomcat/apache-tomcat-9.0.4/
user=root
Group=root

ExecStart=/usr/local/tomcat/apache-tomcat-9.0.4/bin/startup.sh
ExecStop=/usr/local/tomcat/apache-tomcat-9.0.4/bin/shutdown.sh

[Install]
WantedBy=multi-user.target
저장 후, 서비스 데몬 재시작
# systemctl daemon-reload
# systemctl enable tomcat
# systemctl start tomcat
WEB - WAS 연동
1. Web에서 WAS로 proxy 하도록, nginx에서 proxy_pass 설정
WAS서버의 ACG에서 WEB 비공인 IP, 8080포트로 뚫어주기*
# 다시 web서버 접속
# cd /etc/nginx/conf.d
# cp -ap default.conf default.conf.org

# vi /etc/nginx/conf.d/default.conf
server {
    listen       80;
    server_name  localhost;

    #access_log  /var/log/nginx/host.access.log  main;

    location / {
        root   /usr/share/nginx/html;
        index  index.html index.htm;
        proxy_pass http://10.10.1.6:8080;     # <was의 비공인 ip>:8080 추가
    }

    #error_page  404              /404.html;

...


# systemctl restart nginx
2. WEB 공인 IP로 접속해보면 Tomcat으로 프록시 되는 것을 확인할 수 있다.

Next - DB 설치 및 WAS-DB 연동하기👇
[NCP] NCP VPC 환경에서 3-tier 구축하기 - 3.WAS-DB 연동까지 (tistory.com)
'Cloud > NCP' 카테고리의 다른 글
| [Linux] Single Mode - root 패스워드 분실 시 재설정하기 (feat.네이버 클라우드) (0) | 2024.07.28 |
|---|---|
| [NCP] NCP VPC 환경에서 3-tier 구축하기 - 3.WAS-DB 연동까지 (2) | 2024.01.21 |
| [NCP] NCP VPC 환경에서 3-tier 구축하기 - 1. 기본 설정 (VPC, Subnet, NAT Gateway, Route Table, ACG 등) (0) | 2024.01.15 |
| [SSL인증서] NCP - Certificate List에 SSL 인증서 등록 방법 (0) | 2023.08.28 |
| [LVM] 방법3. LVM 해제한 후, 확장하기 (0) | 2023.08.23 |